My little brother called me last month asking how to take a screenshot on his new laptop.
He had been pressing Print Screen and nothing was happening. Or at least he thought nothing was happening. Turned out the screenshot was copying to his clipboard the whole time and he just did not know where it went.
That ten minute call made me realize how many people are genuinely confused about this. Windows has like five different ways to screenshot and nobody ever explains all of them properly in one place.
So here we go. Every method, explained simply.
The Quickest Way: Win + Shift + S
This is the one I use almost every single day.
Press the Windows key, Shift, and S all at the same time. Your screen will go slightly dim and a small toolbar appears at the top.
From there you can select a rectangle, draw a free shape, capture a specific window, or grab the full screen. You pick what you want, drag to select it, and it copies straight to your clipboard.
Then just go wherever you want to paste it, like a chat, an email, a Word doc, and hit Ctrl + V. Done.
This method is fast, flexible, and I genuinely think most people never need anything else once they learn it.
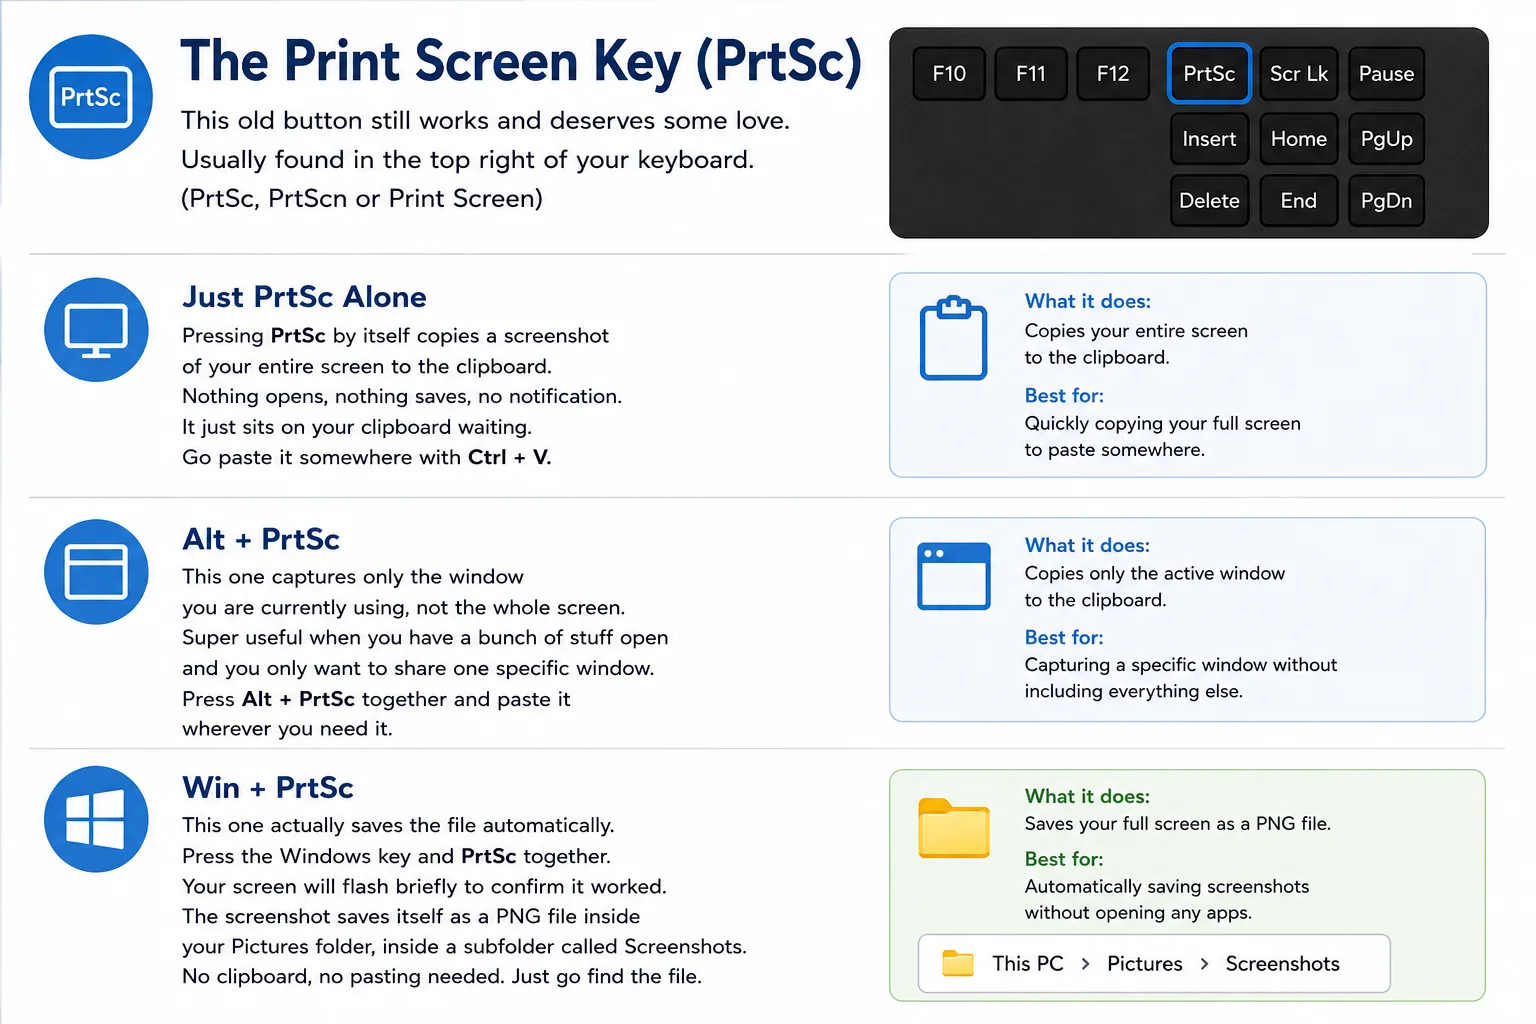 The Print Screen Key (PrtSc)
This old button still works and we should talk about it properly.
It is usually in the top right area of your keyboard. It might say PrtSc or Print Screen or PrtScn depending on the keyboard.
Just PrtSc Alone
Pressing PrtSc by itself copies a screenshot of your entire screen to the clipboard.
Nothing opens, nothing saves, no notification. It just sits on your clipboard waiting. Go paste it somewhere with Ctrl + V.
Alt + PrtSc
This one captures only the window you are currently using, not the whole screen.
Super useful when you have a bunch of stuff open and you only want to share one specific window. Press Alt and PrtSc together and paste it wherever you need it.
Win + PrtSc
This one actually saves the file automatically.
Press the Windows key and PrtSc together. Your screen will flash briefly to confirm it worked. The screenshot saves itself as a PNG file inside your Pictures folder, inside a subfolder called Screenshots.
No clipboard, no pasting needed. Just go find the file.
The Snipping Tool App
Windows has a built in app called Snipping Tool and it is more powerful than most people realise.
Just search for Snipping Tool in the Start menu and open it. Or press Win + Shift + S which launches it directly.
Inside the app you can take a screenshot and then immediately mark it up. Draw on it, highlight something, crop it, add text. It is a basic editor built right in.
If I need to quickly annotate something before sending it to someone, this is what I open. No need to install anything extra.
You can also set a delay in Snipping Tool. So if you need to screenshot a dropdown menu or a tooltip that disappears when you click somewhere else, you set a three or five second timer and then get your screen into position before it captures.
That feature alone has saved me so many times.
Win + PrtSc for Auto Saving
I mentioned this above but it deserves its own section because people miss it.
Win + PrtSc saves a screenshot file without you doing anything else. No clipboard, no pasting, no opening an app.
The file goes to This PC, then Pictures, then Screenshots. It is saved as a PNG with a numbered filename.
If you are someone who takes a lot of screenshots regularly, this is the fastest way to build up a folder of them without thinking about it. I use this when I am documenting something step by step and I just need to capture screen after screen quickly.
Xbox Game Bar for Gamers
If you are gaming or recording your screen, there is another option built into Windows 10 and 11.
Press Win + G to open the Xbox Game Bar overlay.
There is a capture button in there that lets you take screenshots and record clips. It is designed for gaming but it works on regular apps too.
The screenshots save to your Videos folder inside a subfolder called Captures.
Honestly for everyday use the other methods are simpler. But if you are already in a game and you want a quick capture without Alt Tabbing out, this is right there for you.
Also Read: How to Track Sleep on Apple Watch
Third Party Screenshot Tools
Windows built in options cover most situations but some people want more.
There are free tools like ShareX and Greenshot that give you extra features. Scrolling screenshots, automatic uploads, built in annotation, cloud saving, custom shortcuts. Stuff that goes beyond what Windows offers natively.
I use ShareX when I need to capture a long webpage that requires scrolling. Windows cannot do that on its own but ShareX handles it easily.
If you are doing this kind of work regularly, it is worth downloading. It is free and the features are genuinely impressive.
For everyone else, the built in methods are more than enough.
Where Do Screenshots Actually Go?
This is the question that confuses people the most.
It depends on how you took it.
If you pressed just PrtSc or used Win + Shift + S, the screenshot is on your clipboard. It does not save anywhere automatically. You have to paste it somewhere.
If you pressed Win + PrtSc, it saved to Pictures then Screenshots as a PNG file.
If you used Xbox Game Bar, it saved to Videos then Captures.
If you used Snipping Tool and hit save manually, it goes wherever you chose to save it.
That is the full picture. Once you know which method saves where, nothing gets lost anymore.
Quick Summary of Every Method
Just to put it all in one place so you can come back to this easily.
Win + Shift + S opens the selector tool and copies to clipboard. This is the one I recommend for most people.
PrtSc alone copies the full screen to clipboard.
Alt + PrtSc copies only the active window to clipboard.
Win + PrtSc captures the full screen and auto saves to Pictures, Screenshots folder.
Win + G opens Xbox Game Bar for gaming screenshots and clips.
Snipping Tool app gives you screenshots plus basic annotation in one place.
Final Thoughts
Honestly once you know these shortcuts you will never struggle with this again.
I have Win + Shift + S basically muscle memory at this point. It covers like 90 percent of everything I ever need to capture.
But knowing the other methods matters too. Especially Win + PrtSc for when I want to save files fast without thinking, and Snipping Tool for when I need to quickly mark something up before sharing it.
Windows actually gives us a lot here. We just never get told about all of it properly.
Now you know. Go take some screenshots.
FAQs
Why is nothing happening when I press Print Screen?
It is working, it is just copying to clipboard silently. Open any app and press Ctrl + V to paste it.
How do I screenshot just one window?
Press Alt + PrtSc. It captures only the active window and copies it to your clipboard.
Where are my screenshots saved on Windows?
Auto saved screenshots go to Pictures then Screenshots. Clipboard screenshots need to be pasted manually.
How do I screenshot a dropdown menu that disappears?
Open Snipping Tool, set a timer delay of three to five seconds, then get your screen into position before it captures.
Is there a free tool for scrolling screenshots?
Yes. ShareX is free and handles long scrolling page captures that Windows built in tools cannot do.
What is the best screenshot method for beginners?
Win + Shift + S. It is fast, flexible, and works for almost every situation without any setup.